
The breadboard requires a power source to bring these circuits to life. It needed to be connected to the power source to analyze the circuit performance.
The breadboard can be powered by a variety of sources, including batteries, power supply units, and breadboard power supply modules. In the battery power method, we used a battery and battery clips to power the breadboard. The battery holder with clips can also be used. The power supply unit offers a variety of voltage and current and it is mostly used in laboratory settings. The last and easy-to-use method is the use of breadboard power supply modules, which are plugged directly into the breadboard and offer two voltage settings.
In this article, we’ll explore the different ways to power a breadboard, to assist those who are new to electronics and want to start their adventure.
Different ways to power breadboard
The breadboard is the heart of the circuit prototyping, it has enabled the testing and analysis of the circuit without soldering.
It is also an amazing tool for beginners to start their electronic circuits journey. The breadboard is a rectangular board with a grid of holes into which electronic components like resistors, capacitors, integrated circuits, and wires can be inserted.
The components on the board can be easily connected to create circuits. The breadboard has a specific layout and in the specific area, the components will be connected.
The power source needs to be connected to the breadboard in order to supply voltage to the circuit, which is necessary for the circuit to function.
There are several ways to power a breadboard, depending on your needs and the components you’re working with. Every method has its own pros and cons.
Let’s discuss the different ways to power a breadboard.
1. Battery Power
Among the different methods to power a breadboard, battery power is a simple and versatile solution.
Battery power offers portability, convenience, and independence from mains electricity, making it an attractive option for beginners.
To power the breadboard using a battery all you need is a battery and a battery clip.
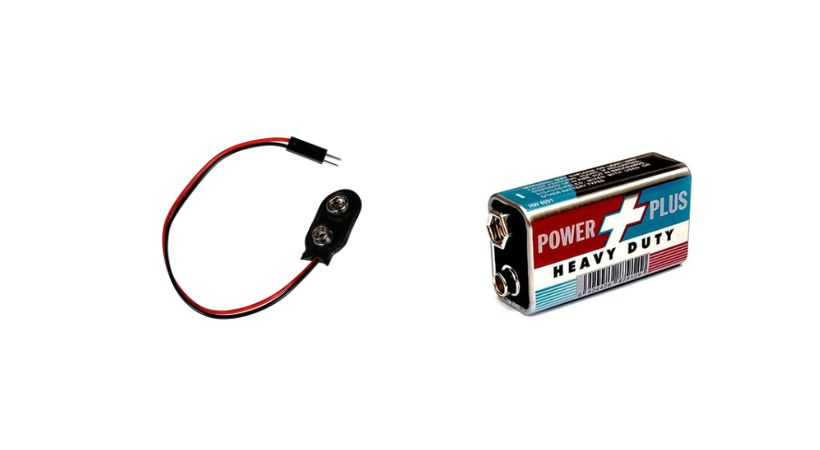
For electronic projects 9V and 12V batteries are commonly used. Consider the voltage and capacity requirements of your circuit when selecting batteries.
The breadboard has power rails on it where it is mentioned where to connect the positive and negative of the battery clip.
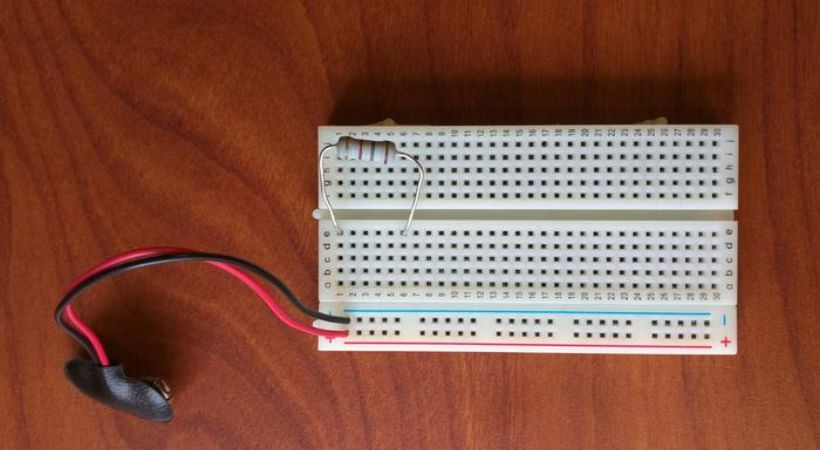
Connect the red wire of the battery clip to the positive rail and the black wire to the negative rail. Now take the battery and connect it to the clip. The entire row of the breadboard has voltage so by using jumping wires you can take that voltage to provide power to the circuit.
Instead, using a 9V or 12-volt battery you can also use AA or AAA cells. These batteries typically provide a nominal voltage of 1.5 volts each.
To use AA or AAA cells, a battery holder is used to secure and connect the batteries in series. It ensures a stable connection and prevents the batteries from rolling around or coming into contact with each other, which could cause a short circuit.

Now Choose the appropriate type and number of batteries based on the voltage requirements of your circuit. Insert the batteries into the battery holder, ensuring they are oriented correctly according to the polarity markings (+ and -).
The connection of the battery holder is the same as discussed above. Connect the battery holder using its connecting wires, once the batteries are connected, turn on your circuit and monitor its operation.
We can power a breadboard using batteries with a battery holder and clip. Let’s see the advantages and disadvantages of the method.
Pros
- Battery power offers portability, allowing breadboard circuits to be used in locations where mains power is unavailable.
- The method is easy to set up and doesn’t require complex wiring or external power sources, making it an excellent choice for beginners.
- Batteries typically provide a stable voltage output over their lifespan, ensuring consistent performance of the circuit.
- Battery power is generally considered safe when handled properly.
Cons
- The first drawback is the battery has a finite lifespan and it requires replacement after some time.
- The voltage and current capacity of battery-powered circuits are limited by the type and number of batteries used.
The battery power method offers a convenient and portable solution for powering breadboard circuits, making it an excellent choice for beginners. Make sure you select the right voltage battery for your projects.
2. DC power supply
Another versatile tool for powering electronic circuits on breadboards is the DC power supply. A DC power supply converts alternating current (AC) from a mains power source into a steady DC output voltage.
The DC power supply offers precise control over voltage, making it a suitable option for testing complex electronic circuits. However, it also requires proper handling while working with it.
The DC power supply offers an adjustable voltage setting, which is considered one of the primary advantages.
They are commonly used in laboratories, workshops, and educational institutions for powering breadboard circuits during experimentation, prototyping, and troubleshooting.
Now how can you connect the power supply to your breadboard, here is the answer.
Take the power supply and identify the output terminal which is normally labeled with “+” and “-” signs or can have black and red color terminals.
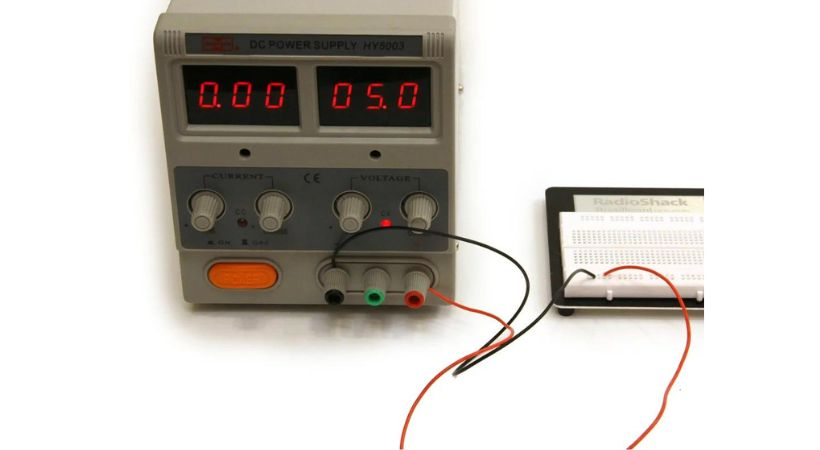
Connect the jumping wires, black to the black terminal and red to the red terminal of the power supply.
Now after the connections connect the red wire to the positive and the black wire to the negative of the power rail of the breadboard. Set the voltage by turning the knob of the power supply.
These are simple steps that allow you to safely and effectively connect a DC power supply to your breadboard.
It is important to understand the advantages and disadvantages of using a DC power supply.
Pros
- DC power supplies allow precise control over voltage and current levels, which is essential for testing and experimenting with electronic circuits.
- The voltage and current can be easily adjusted according to the circuit requirements.
- It also provides constant and precise output voltage.
- DC power supplies are ideal for powering complex circuits that require precise voltage and current regulation.
Cons
- The DC power supply can be relatively expensive, especially for those with advanced features and higher power ratings.
- Unlike battery-powered options, DC power supplies typically require a stable AC power source, limiting their portability.
- It may be more complex to operate as compared to a simple process of using a battery.
- Depending on the power rating and features, DC power supplies can be bulky and heavy, occupying valuable workspace.
The DC power supply for powering a breadboard is the perfect choice for an environment where various circuits are being tested and require varying voltage settings.
3. Breadboard power supply module
The breadboard power supply module is an electronic device specifically designed to provide power to a breadboard. It comes in a small form which can be directly inserted into the breadboard.
The power supply module consists of various components, including voltage regulators, input/output connectors, status indicators, and protective features.
It offers two different voltage level options to test circuit performance. The module is very easy to use.
You have to identify the power rails on the breadboard and insert the module in the board using its pins which are present on each side of the module.
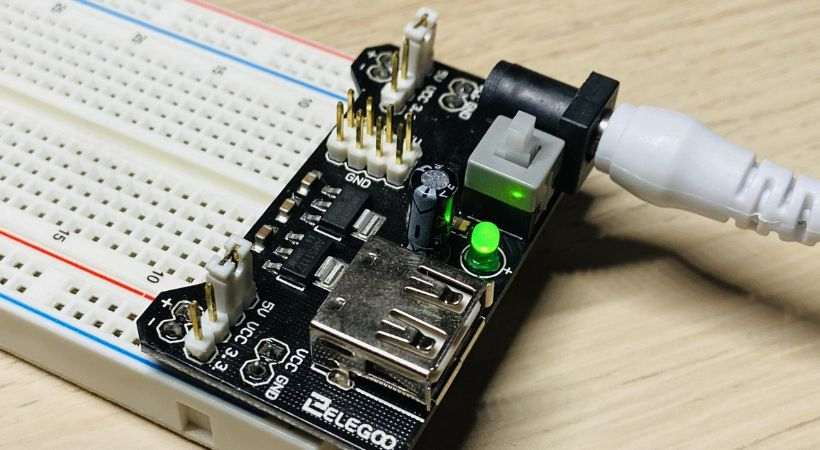
After being connected to the breadboard, the power supply module is powered using a DC power jack or USB input jack. Now, both power rails of the breadboard have 9V.
This is also one of the ways to power the breadboard and analyze and test different electronic circuits.
Everything has advantages and disadvantages, and the above module is no exception. Let’s discuss it.
Pros
- These modules eliminate the need for external power sources.
- The module has an ON/OFF button, so you don’t need to plug in or unplug the power source.
- The breadboard power supply module is very convenient and easy to use.
- They are typically compact and lightweight, occupying minimal space on the breadboard.
Cons
- Some breadboard power supply modules may have limited current output capabilities, which may not be sufficient for powering high-current circuits.
- While breadboard power supply modules offer enhanced convenience and functionality, they may introduce additional complexity for beginners.
Overall, breadboard power supply modules play a vital role in electronics prototyping by providing regulated power directly to the breadboard.
With their compact design, adjustable output, and built-in protection features, these modules offer enhanced convenience and flexibility.
Conclusion
A breadboard is a tool that allows you to test the circuit before permanently soldering it. Engineers use it to prototype their circuits.
The breadboard is a simple board with holes for component insertion, it is the power to operate the circuit.
Various ways can be used to power the breadboard each one has its own importance. The battery power method is most commonly used to power the battery.
The issue with battery power is it allows a fixed amount of voltage and needs replacement after some time but it is one of the excellent choices for beginners.
For laboratory setting the DC power supply method is preferred. It offers different voltage level options which make it a convenient option to work with various circuits.
The breadboard power supply module is a specially designed device for powering the breadboard. It is very easy to use but for beginners, it may be difficult to use.
As I earlier said each method has its own importance so select the power method which is easy and convenient for you.
This is all for how you can power your breadboard, I hope it will be helpful.
Thank you and stay blessed…
**Learn about how to avoid common mistake when powering your breadboard – it is important.