
Proper working of the breadboard is crucial for accurate and reliable circuit building. As a beginner, may need help determining whether the breadboard works accurately.
So how do I know if my breadboard is working fine or not?
To know if the breadboard is working or not, first visually inspect the breadboard. If the breadboard is damaged or the holes are burned, it means this breadboard may have a damaged internal connection, so it can not be used for circuit building. The most effective method for breadboard testing is the use of a multimeter in continuity mode. If the breadboard holes are good, it will produce the sound of a beep.
In this article, we’ll talk in detail about how do I know if my breadboard is working.
Testing breadboard functionality
Before going into details of how to know if your breadboard is working or not, let’s discuss how a breadboard works and its layout.
Unlike some electronic components, a breadboard isn’t powered by itself. It consists of holes that are arranged in rows and columns.
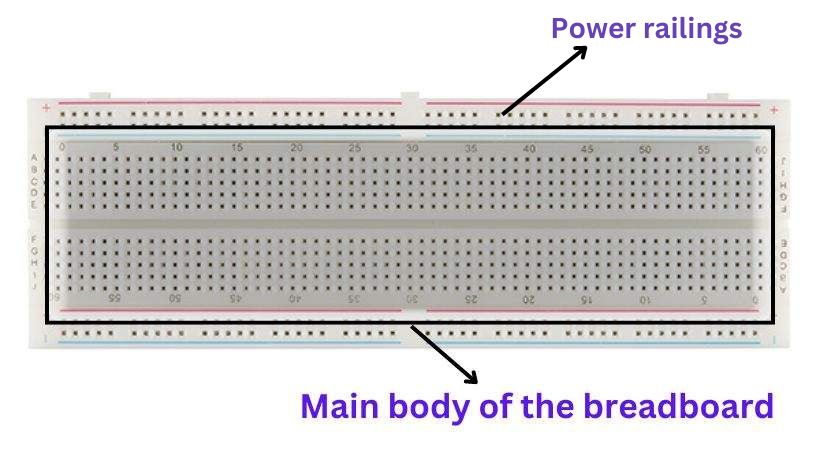
The holes on the breadboard facilitate the gripping of the electronic components to create temporary connections. Now, the holes that are arranged in rows and columns are divided into two portions.
The upper and lower portion is called the power railing; the holes in this portion are internally connected horizontally. Between the power railings, there is a component connection area.
This tool is essential for testing various electronic circuits, so a fully functional breadboard is crucial for accurate and reliable prototyping and testing of electronic circuits.
It ensures that all components and connections function correctly, preventing errors and potential damage to components.
Now imagine you build the whole circuit on the breadboard and after turning on the power, the circuit is still not working and surprisingly, all connections are correct so what do you think?
You are thinking right, maybe there is an issue with the breadboard. It is important to know if your breadboard is working fine or not.
Let’s see how you can know if your breadboard is working or not…
Testing the breadboard is a simple and easy process. You don’t need expensive tools to test the working of the breadboard.
Here’s a detailed explanation of how to verify the functionality of your breadboard.
1. Visual inspection
The first thing is visual inspection. When you take out your breadboard, carefully observe the breadboard visually.
Sometimes, the breadboard has visible signs of damage. If you see broken or bent pins, burnt spots, cracks, or any other physical deformities, it means the breadboard functionality is affected, and it may not work as intended.
If you don’t see any physical damage on the breadboard, then follow the next method of breadboard testing.
2. Test with a multimeter
A multimeter is one of the most effective and useful tools in electronics. It allows the measurement of different electrical parameters such as current, voltage, resistance, and capacitance.
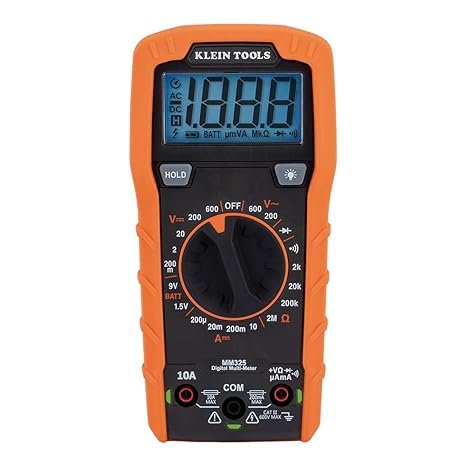
The multimeter is also used for testing the functionality of different electronic components. So, using a multimeter to check continuity helps to verify the internal connections of the breadboard.
Follow the following steps to test the breadboard with a multimeter.
- Take out your multimeter.
- Connect the probes to the multimeter.
- Test the multimeter in continuity mode. This mode is often indicated by a diode symbol or a sound wave symbol.
- Insert the probes into the power rails at different points along the breadboard.
- If there is a connection, the multimeter will produce a beep sound.
- If the connection is damaged, you will hear no sound.
Apart from the continuity mode, you can also use the multimeter’s voltage mode. In this method, you can verify if the breadboard is correctly distributing power from an external supply.
- Attach a power supply to the breadboard’s power rails. For example, connect a 5V power supply to the positive rail and ground (GND) to the negative rail.
- Set the multimeter to voltage mode.
- Insert the probes into holes of the power rail on two points and note the readings.
- Check the voltage at some other holes also.
- If you see consistent voltage, it means the breadboard is in working condition.
This is how you can test your breadboard to see if it is working or not to avoid any issues in the future.
3. Make a simple circuit
Construct a basic circuit to test the breadboard’s functionality. You can make a simple LED circuit and check the LED behavior.
Follow these steps to build a simple LED circuit to check the functionality of the breadboard.
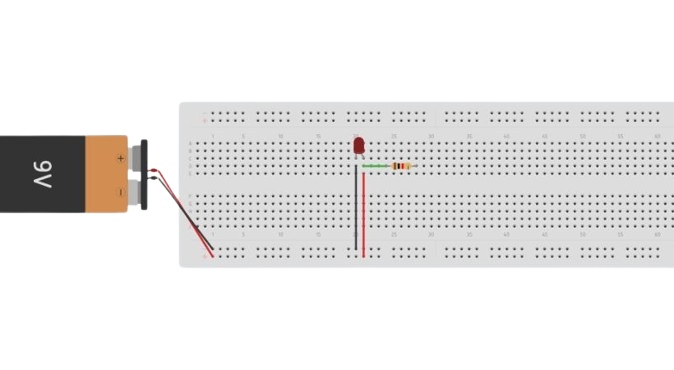
- You will have components like an LED, a 470 Ω resistor, and a 9V battery.
- Connect the positive terminal of the battery to the positive of the breadboard and the negative of the battery to the negative of the breadboard.
- Place the LED into two holes in the main area of the breadboard.
- Connect the longer leg, which is the anode, to the positive of the power rail.
- Connect one end of the resistor to the same row as the LED cathode and the other end to the negative rail.
- If the LED lights up, it means that your breadboard is working.
- If it doesn’t light up, recheck the connection or test the other section of the breadboard.
- After changing the check, if the didn’t solve change the breadboard.
These are some methods that would help you find out if your breadboard is working or not. The reliable and effective method is used of the multimeter as it will tell you about each connection of the breadboard.
Conclusion
Regularly testing your breadboard is essential for successful electronic prototyping and circuit testing.
A breadboard is a tool that helps you test your project schematic diagram’s functionality before making its permanent connections.
To test the breadboard, you can visually inspect it for any damage or bent pins. If the breadboard looks good, then go for a multimeter.
The multimeter continuity mode produces a beep when a connection is not damaged, and if the breadboard hole connection is damaged, you will hear no beep sound.
You can also make a simple LED circuit on the breadboard to test its functionality. Breadboard testing ensures that your breadboard is functioning correctly, allowing you to build and test circuits with confidence.
Remember that, like any other tool, the breadboard also needs proper care and maintenance.
By following the tips given in the article, you can ensure your breadboard is ready to help you bring your electronic creations to life!
That’s it, this was all about breadboard testing. I hope it is helpful when you are working on the breadboard.
Thank you…
Other useful posts: