Hi. Hope you are having a good life. In this article, I share my knowledge about how a multimeter measures voltage.
You are in a situation where you need to know how to measure or test a voltage. It could be AC mains voltage in the wall outlet, or across the electrical motor, or you just want to know the voltage of your car battery.
There are many possible situations where you may need to measure the voltages. In all those situations, a multimeter is an easy tool you can use to do so.
Besides a multimeter, other methods are available too, such as an oscilloscope. But multimeter is the most cheaper way. In this post, I will try my best to guide you on how to use a multimeter to measures voltage (AC/DC) in an easy step by step process.
Step by step process of how to measure voltages
Let me suppose you are a group of people who are not very new to a multimeter. You have your own multimeter and now reading this article to learn how to use it to measure voltages.
For people very new to a multimeter, let me just explain a few things here before going into the actual topic.
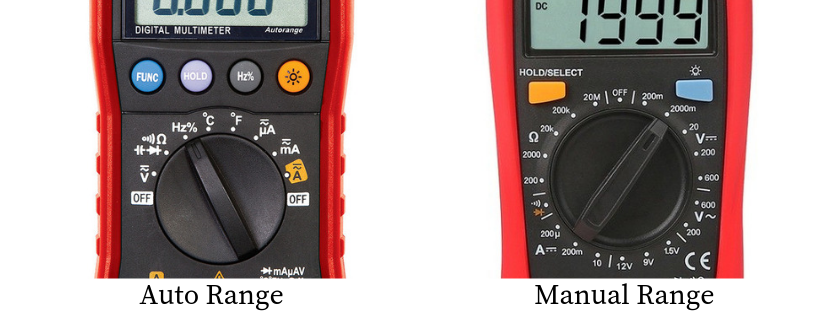
There are two types of multimeter, (a) Auto range multimeter and (b) Manual range multimeter. Both types work the same. The difference is, the first one is way easy to use and later is a little old technology and needs manual extra work.
How to identify auto and manual range multimeter?
It is very simple. See the following picture for reference. Focus on the dial and compare it with your own multimeter, if you have bought it already.
My advice is, always go for the auto range one. It automatically sets the required range, you just focus on your measurements.
Now, I think you are very sure what multimeter you have, it is time to go in steps and find out how you can measure voltages with a multimeter.
1. Guess the nature of your voltage
This step is pretty self-explanatory. You have to know what type of voltage you are dealing with. Is it AC or DC.
For example, the voltage in a wall outlet(socket) is AC and that of a battery is DC. Most portable electronics types of equipment are DC powered and I recommend stick yourself around DC circuits (such as a sensor hooked up to an Arduino) only.
I am not saying you cannot measure AC voltages. I am just saying AC is far more dangerous than DC. Go slow and double-check everything before you test an AC circuit.
If you really need to check how multimeter measures voltage on AC circuits, like to see an outlet is ‘ON’ then use an AC tester.
The only times we’ve needed to measure AC are when we’ve got an outlet that is acting funny (is it really at 110V?), or if we’re trying to control a heater (such as a hot plate). For messing with AC voltage, my advice is, get yourself a non-contact tester rather than using a multimeter.
2. Rough Guess the range of your voltage
Guessing a range goes especially for people using a manual range multimeter. If you are using an auto-range multimeter, you can skip this step.
Alright!
In the first step, you find out the nature of the voltage you are going to measure. In the second step, it is important to just roughly guess a range. This range should not be very accurate. With time I have learned that guessing a rough range is pretty useful.
For example, I want to measure the car battery voltage to know if the battery is working fine or not. I know car batteries are below 15V. I do not know the exact voltage but I am sure they are below 15V. With this in mind, I will select the range of the multimeter somewhere around 15V or above. This will give me accurate results straightforward.
What if you do not make an educational rough range?
The answer is still accurate results. A multimeter shows you an indication of a wrong range selection. This indication continues until you select the accurate range. You will probably see the meter screen change and then read ‘1’. 1 in multimeter means “Not in Range”. If you are not able to make a guess then always start from the highest range.
3. How multimeter measures voltage?
You find out the nature of voltage and then tried to guess a proper range. Now, it is time to make some voltage measurements or testing with the multimeter.
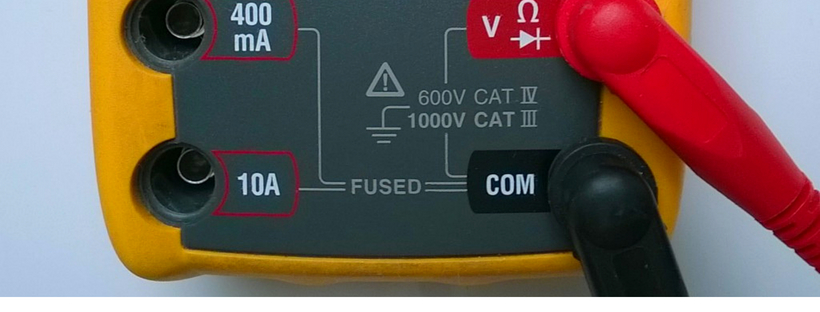
- Plug the probe leads into multimeter specific ports. Plug the black probe (ground or negative lead) in COM socket. And plug the read prob (Positive) into V marked socket on the meter as shown below.
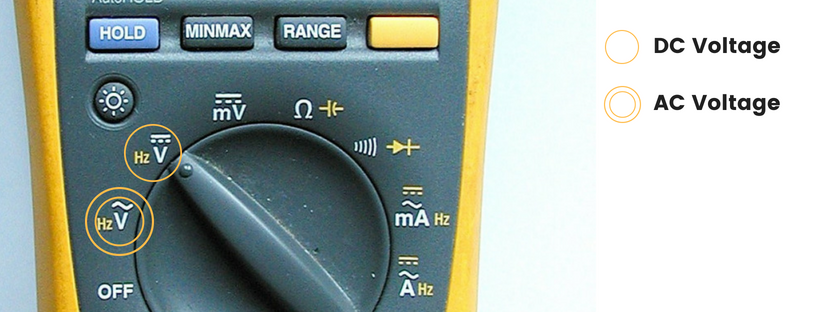
- Set the range on the multimeter. This depends on what type of multimeter you are using. If you are using Fluke Multimeter then do not worry about selecting any range. It is an auto range multimeter. Just turn the dial to the ‘V’ setting with the symbol for AC or DC as shown below.
- If you are using manual range setting dial meter then turn the dial to select AC or DC volts and pick a range to give the required accuracy. Remember, measuring 12 volts on the 20-volt range will give more decimal places than on the 200-volt range.
- Connect the multimeter parallel in a circuit under test. Remember multimeter is always connected in parallel with a circuit in order to measure the voltage. This means two probes of the multimeter (black and red) must be connected in parallel with the voltage source or any load in which voltage needs to be measured.
- It is always good to power off the circuit under test (especially for AC main). When you powered off the circuitry. Put the negative probe (the black one) against the neutral point of the circuit or against the reference point of the wiring or circuitry. Then power On the circuit. Place the other probe(the red one) against the second point of the circuit under test.
- When you are measuring small DC voltages you do not need to power the circuit off.
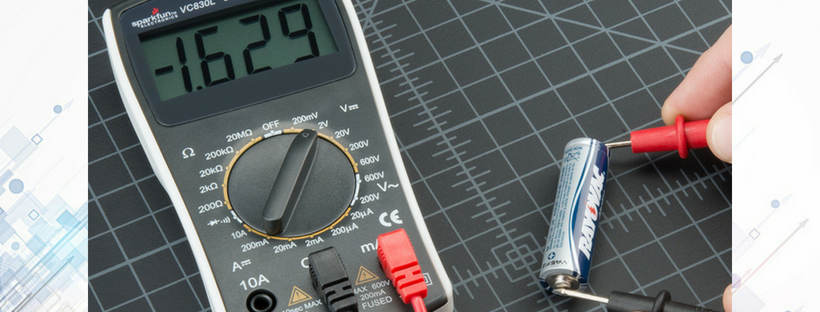
- For example, measuring the voltage on an AA battery is simple. Connect positive (red) probe of the multimeter to the positive terminal of the battery and the same goes for a negative (black) probe. You will get the reading on the LCD display of 1.5V.
What if you interchange the probes like you connect positive probe of a multimeter to the negative terminal of a battery. And a negative probe of the multimeter to the positive terminal of the battery.
The reading on the multimeter is simply negative.
Remember, the multimeter measures a voltage in relation to the common probe i.e. black one. How much voltage is there on the ‘+’ of the battery compared to common or the negative pin? 1.5V. If we switch the probes, we define ‘+’ as the common or a zero point. How much voltage is there on the ‘-’ of the battery compared to our new zero? -1.5V!
Please make sure not to short any probe. Always make sure probes are placed on two different points on the circuit under test. Shorting probes can occur if you are trying to measure voltages on PCB boards.
In the end, you can see the results on your LCD display.
For measuring AC voltages pay very close attention to the following points: These are safety points for measuring high voltages (both AC and DC), never ever forget these points. Your life is important, I care for your life.
- Never use damaged probes, never ever.
- In case of measuring main voltages (high voltages), always try to power off the circuitry under test. I recommend always power it off.
- Never missed off with things you have no clear idea.
- Always connect the neutral wire first to the multimeter (Put the probe of the multimeter in the neutral terminal first). If you insert the probe into a live wire first and the meter is faulty, the current could flow through the meter to the neutral probe of the multimeter in your hands. If you then inadvertently touch the probe, there is a possibility of shock.
- Always double-check that probes are in the correct socket outlet on a multimeter. If you mistakenly connect the red probe into the current socket and try to measure AC main voltages, you will end in blowing your multimeter forever.
Conclusion
My conclusion on how multimeter measures voltage goes like, it is easy and fun to measure DC voltages when the levels are low. Such as measuring voltages of, Arduino pins, small resistive circuits, or other small portable electronic equipment, or AA batteries. But pay great attention when you are measuring high voltages such as AC mains. A silly mistake could harm you.
The following are the easy steps one can follow to measure voltages.
- First, get to know the nature of your measuring voltage i.e. is it AC or DC.
- Connect the probes in the right ports i.e. black into COM and red into V port.
- For manual range type, guess a rough range in the function area of V (DC) or V (AC). A good practice is to start from the lowest range and then increase it until you get reasonable results.
- For auto range type align you function switch to V(DC) or V(AC). No need for range selection.
- Connect the probes to the points you want to measure the voltage across.
- Get the reading on the display.
- It is a good practice to always buy a multimeter with at-least CAT III or IV protection when you are measuring AC voltages.
This is what I know about how multimeter measures voltage. I hope you enjoyed it and got your answer.
Thank you and have a good life.
Other useful posts:


