
A diode is a polarized component so placing diode on breadboard is crucial for building functional circuits.
To connect the diode properly and effectively first, you have to check its polarity. After polarity or pin identification place the diode pins in the two holes of the same row of the breadboard. The placing of the diode on the breadboard depends upon the circuit schematics. Always check the polarity of the diode, trim the leads if needed, and before putting components make sure you know about the breadboard layout.
In this article, we’ll learn to place a diode on the breadboard properly and effectively to avoid damage to the component as a beginner.
Diode placement on breadboard
A diode is a two-terminal polarized electronic component. It allows the current to follow in one direction and block in another direction. That’s why it is called a uni-directional component.
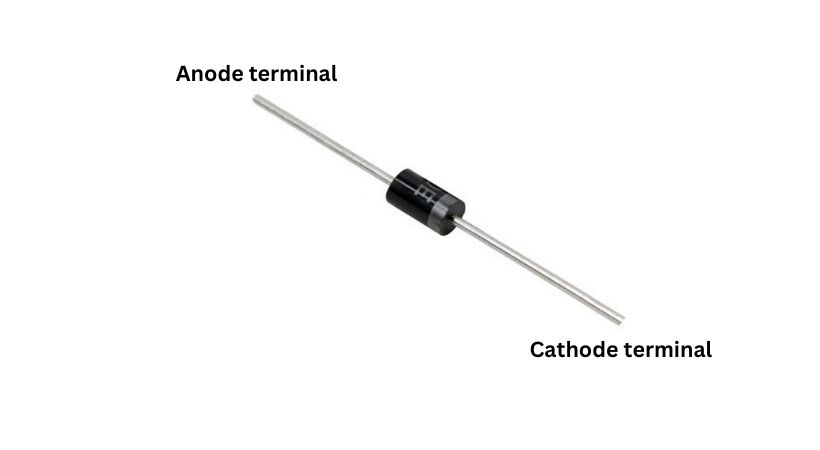
The two terminals are called anode and cathode. The anode is the positive terminal and the cathode is the negative terminal.
The diode should be properly biased so that’s why the correct placement of the component becomes crucial.
Let’s discuss the process of placing diode on breadboard.
Step-by-step process
Placing diode on breadboard is straightforward.
Here’s a step-by-step guide to help you correctly place and connect a diode on a breadboard:
1. Learn the breadboard layout
If you are a beginner understanding the breadboard layout should be the first step whenever you are building a circuit. The breadboard has numerous holes that are arranged in rows and columns.
The upper and lower parts of the breadboard are for power connections and between the two power portions it has the main component connection area.
Remember that the holes in the power portion are connected horizontally and the holes in the main area are connected vertically.
Learning the breadboard is essential for proper component connection.
2. Identify anode and cathode
Select a diode which will be used in your project. Keep the diode ratings in your mind.
After selection identify the pins of the diode. The diode has a gray or black bar, that end is the cathode and the other end is an anode.
If you are using a used diode and the bar code is removed, you use a component tester to identify the anode and cathode.
3. Place the diode on the breadboard
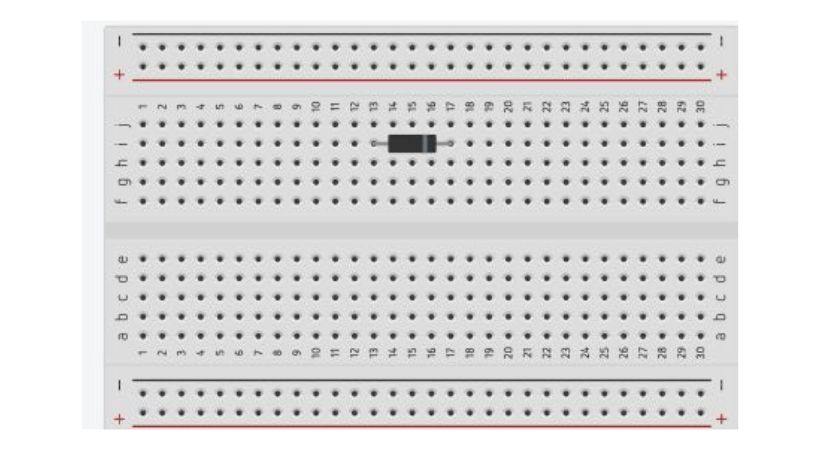
After the identification of the polarity of the diode, now you can place the diode leads into the two holes of the same row of the breadboard.
If the leads of the diode are too long, you can cut them up to the appropriate length to make a strong connection on the breadboard.
The diode placement on the breadboard also depended on the circuit schematics. Now the whole column is connected to the diode because the main area of the breadboard is connected vertically.
4. Connect other components
After the diode connection, connect the different components to the diode as instructed in the circuit diagram.
Add the resistor, and LED if needed. Use jumper wires to connect the power source to the breadboard.
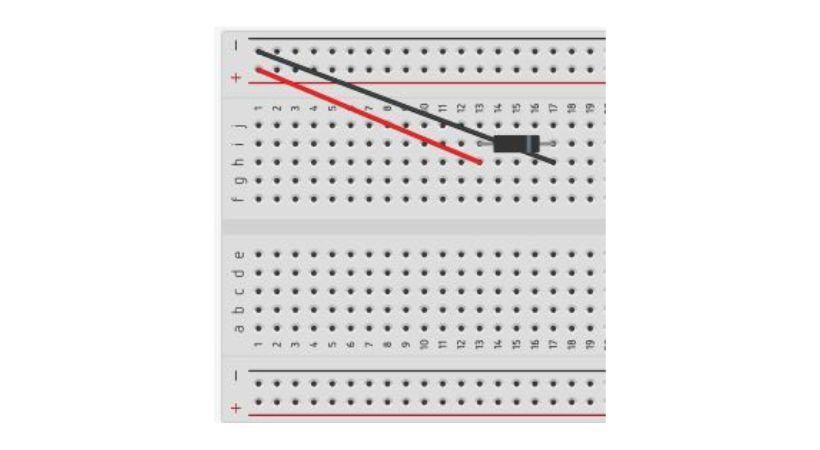
Connect the positive terminal of the power source to the row containing the diode’s anode and connect the negative terminal of the power source to the row containing the diode’s cathode.
Make sure to double-check all the connections after completing a circuit.
Common mistakes to avoid
If you are a beginner or expert, making mistakes is a must so if you make a mistake don’t worry, and learn from it.
Here are some mistakes that can happen while you are putting a diode on the breadboard.
1. Wrong polarity
Identifying the polarity of the diode wrong and connecting them in reverse is the most common mistake a beginner can make.
Correctly identify the cathode and anode of the diode by looking at the bar. The gray or black on the diode indicates the cathode terminal.
The incorrect polarity identification can cause a malfunction of the circuit.
2. Poor connection
Sometimes the diode is not properly inserted into the breadboard holes which leads to poor connections. This is sometimes due to the long leads of the diode.
When inserting components in the holes of the breadboard requires little force. Always make sure that the diode leads are firmly inserted into the breadboard to make proper contact.
3. Misidentifying breadboard layout
Confusing the internal connections of the breadboard like confusion in the vertical and horizontal connections of the holes.
Understand the breadboard layout, the holes power rails are horizontally connected and the holes in the main area are vertically connected.
So breadboard has a split power rail so not connecting them together correctly is also a mistake that can happen. Use jumper wires to connect both sides of the power rails if needed.
4. Ignoring diode ratings
select the diode according to the circuit current and voltage ratings. Connecting a diode that can’t bear the applied voltage can lead to overheating and eventually damage to the diode.
Look for a diode, understand its ratings, and learn how can you connect it to prevent it from damage.
5. Incorrect power connections
An incorrect power supply connection can affect the current flow to the diode and will affect the overall performance of the circuit. The diode needs proper biasing to perform efficiently.
Carefully check the power supply connections to ensure they match the intended circuit design, with the positive terminal connected to the anode and the negative terminal to the cathode.
These are some mistakes so by being mindful of these common mistakes and following best practices, you can successfully place and use diodes on a breadboard in their electronic projects.
Conclusion
The diode is an essential component in electronics for rectification, voltage regulation, and switches.
Properly placing a diode on a breadboard is crucial for ensuring your circuit functions correctly. For the correct placement of the diode, you need to follow these steps…
- Understanding the row and column connection of the breadboard
- Identify the pin of the diode
- Place the diode leads into two holes in the same row
- Properly bias the diode by connecting the positive of the batter to the anode and the negative to the cathode
- After that complete the circuit and check the connection if they are correct or not.
By following the above step you can put a diode effectively and efficiently on the breadboard.
Keep in mind mistakes can happen so be mindful of mistakes like incorrect pin connections, ignoring the split power railing connections, and wrong polarity identification.
Practice and careful attention to detail will help you become proficient in working with diodes and breadboards.
This is all about the diode’s proper placement on the breadboard, I hope it will help.
Thank you and stay blessed…
Other useful posts: