
To control the flow current in the circuit switches are used so Properly placing switch on breadboard is crucial for the correct operation of your circuit.
To properly place switches on a breadboard, insert the switch so that each pin is in a separate row, ideally straddling the central gap of the breadboard. Ensure firm connections to avoid intermittent contact. Test the switch independently before integrating it into your main circuit. Select the right switch according to your circuit requirements, and place the switch in the correct location.
In this article, let’s discuss how to position your switch on the breadboard correctly and prevent mistakes.
Switches connection on the breadboard
Breadboard is the component that gives life to the circuit schematic. It allows the connection of different electronic components logically to get the intended output.
A breadboard is made up of different holes that are arranged in rows and columns to hold components.
Switches are the electronic components that “NO” and “OFF” the current to the circuit, which makes it a valuable component for the circuits where control of the current is required.
Different switches such as Single-pole single-throw (SPST), double-pole double-throw (DPDT), and Single-pole double-throw (SPDT).
The switch should be connected correctly on the breadboard so that it performs effectively. If connected wrongly it may damage the other components or can lead to the circuit failure.
As a beginner, you may face challenges while connecting the switch on the breadboard, so don’t worry.
Let’s talk in detail about the process of placing the switch on the breadboard.
Steps to place switches
Here’s the step-by-step process of how to properly place switches on a breadboard.
1. Learn the breadboard layout
To place the switch correctly on the breadboard, it is essential to understand the breadboard layout. The breadboard has two portions.
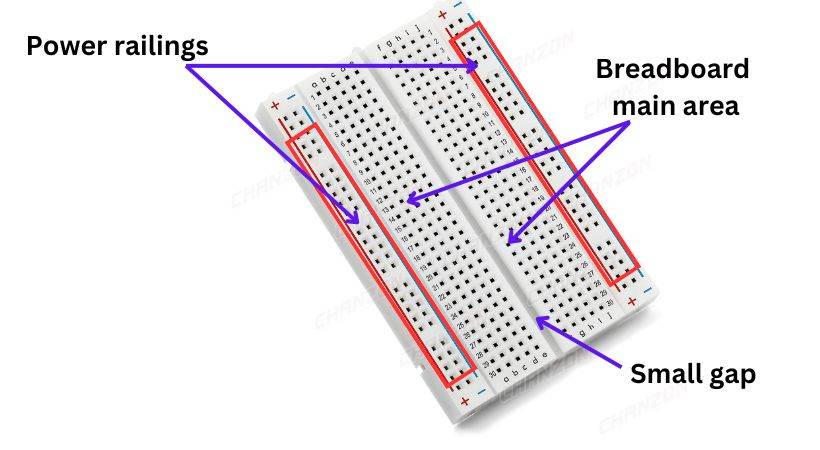
The upper and lower portion is known as power railings and the holes in this area are connected horizontally.
Between the power railing, the main area of the breadboard is divided into two parts, and the holes are connected vertically in this area.
You will note a small gap between the two parts of the main area. This small gap is useful to connect components having pins on both sides.
2. Selection of right switch
Different types of switches are available, so selecting the right switch for the project is a crucial step. You must understand the different switches and how they work.
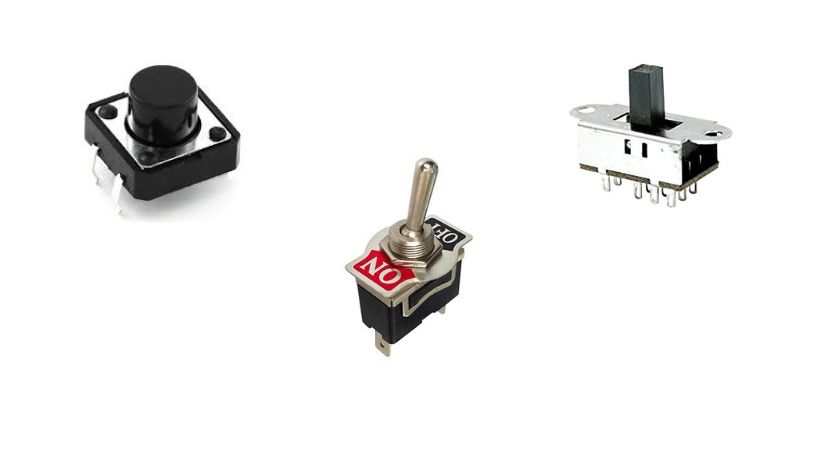
Select a switch that is compatible with your breadboard. Common types include SPST (Single Pole Single Throw) push-button switches, toggle switches, and slide switches.
Let’s say you have selected a push-button so Identify the switch pin configuration using a multimeter in resistance mode.
If you want to learn how to identify switch pin configuration, here is our article:
3. Insert the switch
Now after switch selection and pin configuration, it’s time to insert the switch on the breadboard. Insert the switch’s pins into the breadboard holes.
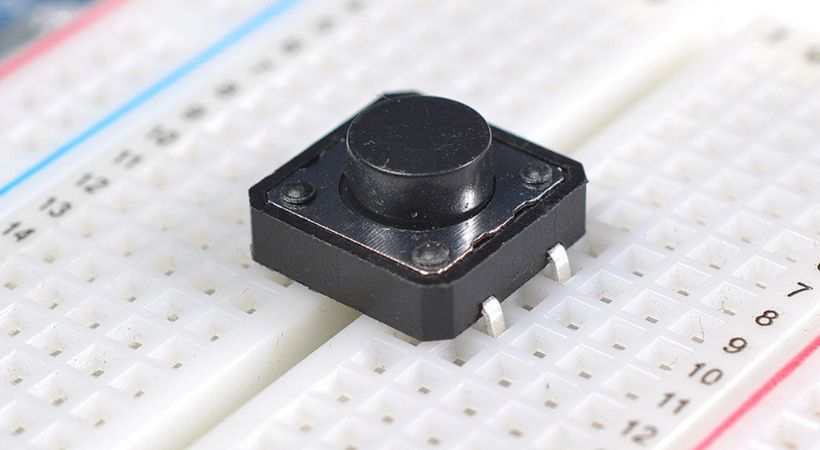
For a standard push-button switch, this usually means placing it across the central gap so that each pin is in a separate column.
If the switch is placed on the main breadboard area it will short its pins as the rows in that area are connected vertically.
Ensure that the pins are inserted into different rows and each pin is in different columns to prevent short circuits.
4. Wiring the switch
Before connecting a switch, understand how you want to connect a switch in the circuit.
Take jumper wires to Connect one pin of the switch to the power railing and the other pin to the input of your circuit, typically connected to LED or other components that need current control.
Make sure that all connections you made are correct and that components pins and jumper wire are inserted properly in the breadboard holes.
Common mistakes to avoid
Mistakes can be made while placing any components on the breadboard so here are some mistakes that should be avoided while placing a switch on the breadboard.
1. Incorrect pin identification
Correct pin configuration is essential for the reliable and smooth operation of the switch. Connecting the switch pins wrongly can lead to damage to the switch and other components.
Make sure you identify pins correctly and position them in the circuit according to your desired function. Refer to the datasheet or use a multimeter in the resistance mode.
2. Loose connections
Proper and strong connections are necessary for a circuit to perform as intended.
While inserting the switch, push the switch legs firmly into the breadboard holes. A loose connection can cause intermittent circuit behavior or complete failure.
Ensure that all the connections on the breadboard are strong and all the wires are inserted firmly into the holes.
3. Incorrect placement
The switch is placed in the center gap on the breadboard so the pin doesn’t cause a short circuit. If you put a switch on the breadboard main area, it means you short the switch pins as the holes are connected vertically.
Ensure each pin is inserted into a different row or column to avoid short circuits.
4. Not planning connections
Think about how you want the switch to function in your circuit before making connections with jumper wires.
Consider what should be connected when the switch is open and closed. This will help you avoid frustration during debugging.
These are some basic mistakes that can be made while putting the switch on the breadboard so pay attention to every detail when working with the breadboard and components.
Conclusion
Properly placing switch on breadboard is essential for reliable circuit operation.
Understand the breadboard layout, select the right switch, configure the switch pins correctly, and insert the switch properly on the breadboard.
Place the breadboard in the central gap to avoid a short circuit. Always plan how you want a switch to perform and make the connection accordingly.
Always avoid common mistakes like incorrect pin identification, not firmly inserting the switch in the holes, placing the switch in the wrong portion of the breadboard, and not planning the connections.
These mistakes can lead to short circuits and damage to the switch and other electronic components in the circuit.
This was all about placing switch on breadboard, I hope it will be helpful.
Thank you and stay blessed…
Other useful posts: